Monday, 10 March 2014

de Winter of 79 Commando

6th of June, the Shore of Western Europe

D-Day


X Troop 79 Commando wade ashore - their Objective GBH Bunker. Confusion reigns and the HQ, Bren and rifle teams are intermingled. Capt de Winter leads the way....


 Across the wire, in the distance the bunker cover party appear and open fire


The Commandos are held up by the wire, bren fire, grenades, sten guns all have no effect on the machine gun team in the bunker - but one burst of fire does injure the loader and the rate of fire slackens. To the right a lone rifle armed commando takes on three schutzen until his mates clear the wire


At them with the bayonet! A volley of shots and X Commando go in to clear the cover party.


Too Late Chum! de Winter deals with the MG42 team....

This was an impromptu game with pretty - ok, very, basic terrain. The figures are Warlord Commandos painted by myself while the Germans are warlord FJ painted up in "full on late war camo madness" by Jim Brent. Mark and I have speculated over using IHMN for WW2 and this is the result. I gave de Winter marksman with pistol, inspirational and leader with the stat line of a Captain from IHMN, the lads were rated as Guards/Royal Marines with a couple of NCOs. The Germans were jager from the book; the MG42 was presumed to be brassing the beach up in general with one unlucky commando getting its attention each turn. This really meant that until they cleared the wire, one trooper was being lost most turns. That was until the turn the bren gunner was hit; then a sten gunner was fired at and survived, he managed to clip the MG42 No2 after which it didnt hit anything. 

Due to internet wobbles this took longer to blog than play and does raise a question in my mind - just what did X troop get up to before D-Day?

Cheers
Maff 


Thursday, 6 March 2014

Life Can Hurt

Apparently I've been running around with two cracked and a dislocated rib! How? I had a minor accident in January, still sore now in March, so went to see doctor. When I had the accident the Doctor was concerned quite rightly about concussion and we put the rest down to general bruising. Being a bloke I ignored the pain which after the first week was more of an inconvenience and on-off distraction rather than anything serious.


Anyway, picked up these 'pre-loved' painted Zulu War Brits on eBay. Heather liked the look of them and she thought they'd be good for our non-wargamer multi-player Rorkes Drift game. Done.

Cheers
Mark

Update: Pain finally went away over the Easter Break.

Monday, 3 March 2014

SITREP

Thanks to encouragement from Jim Brent, I've started to get my painting mojo back! Still early days but I'm steadily working through Ultra-Modern Russians. Thought I'd finish these before turning my hand to 1979 Brits. Unfolding events in the Ukraine are a complete co-incidence. I simply wanted to get my hand in painting camo before taking on British DPM again.

Wartime Miniatures 20mm Ultra-Modern Russians

I've chosen to represent the slightly older Flora pattern camouflage. After a couple of tests, I deliberately decided to paint the pattern larger than scale and it works really well. A nice contrast can be gained by painting their kit green, and they have a lot of kit. But instead I've taken the slightly harder route and painted it in Flora too (for the most part).

 The Flora pattern comes in different shades and so with the first couple of minis I alternated the colour shades between the fatigues and the kit. And you know what? Couldn't tell more than six inches from my eyeball without painting the lighter shade almost khaki drill. Saving myself the extra effort I just used the same 'avocado' base colour for both the fatigues and kit throughout all 20 plus minis.

Glad the figures worked out to my liking as it has boosted my confidence no end. OK, I'm a bit slow and hesitant just now, plus have a lot to relearn but I'm painting and enjoying it.

Cheers
Mark

Monday, 24 February 2014

Helicopter Magazine 29: Westland Scout

A nice treat came in Issue 29 of Helicopter Magazine, the Westland Scout. Every boy worth his salt in the 1970s had built one of more of these from Airfix, together with squadrons of Folland Gnats and de Havilland Chipmunks.

The model is very nice but exceedingly fragile. You need to exert a lot of care removing it from the packaging and again when trying to get the bloody rotor blades on. Lest you break the frail skids, aerials, blades of rotor shaft itself.

I eventually resorted to paring out the connections where the blades meet shaft and gluing the damn things in place. Still, a lot less hassle than the Airfix kit, and it comes pre-painted with very nice RAF roundels.

The Westland Scout was a very versatile little beast. Both the British Army Air Corps and Royal Marines deployed the Scout in various "light" roles including reconnaissance, aerial surveillance, light transport, special forces insertion, CASEVAC and ground attack. 

It could carry 4 passengers if they all breathed-in and When armed in the light attack configuration it carried either two skid-mounted forward-firing machine guns (L8A1 GPMG) packs or a single pintle-mounted machine gun in the rear cabin. The pintle mount was available in both port and starboard mountings. The gun-packs carried 200 rounds of ammunition each and were both aimed at a pre-set convergence angle. They were mounted on a tubular spar that was fixed between the front and rear undercarriage legs. A Browning M2 machine gun was also tested on a pintle mount in the rear cabin.

The Scout would see action in the Falklands in it's anti-tank helicopter role, carrying 4x SS11 anti-tank missiles. Three Scouts stationed 100m apart fired 10 SS11 missiles at an Argentinian gun battery dug-in west of Stanley Racecourse. Twelve aircraft operated in the Falkland Islands in 1982, six each with 3 Commando Brigade Air Squadron and 656 Squadron Army Air Corps.

In Ulster, Scouts would take part in 2 or 3 aircraft Eagle Flights. Two Scouts would each carry 4 men and set down impromptu VCPs (Vehicle Check Points). The third aircraft when available carried an Observer with the Hele-Tele aerial surveillance system.

Another great addition to the Winter of '79 air arm.

Cheers
Mark


Saturday, 22 February 2014

Mae pont yn rhybyell:1979 - After Action Report

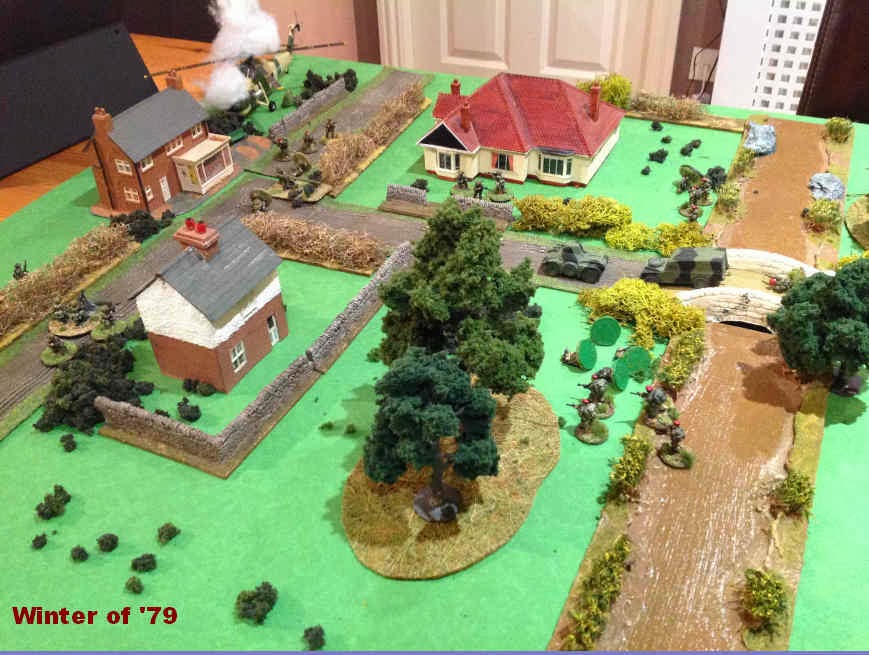
Emergency Government forces are being lured into an anti-armour ambush by Welsh troops north-west of Abergavenny. Terrain was dictated by finding my old 1970's Bellona vac-formed bridge.

Government Forces

Government troops
RH Models, Maff C.O.

1x Motorised patrol from 5 Para: (3x Q4, longs, dashing)
1x Armoured Car patrol from Benson & Hedges Yeomanry (2x Q4, support, armour, dashing)
1x Eagle Flight, 5 Para (2x Q4, longs, dashing; 2 Helos, inc 1x Gunship Q4, support)

Free Wales Forces

Free Wales Territorials
Elhiem Figures, Mark C.O.

1x Cadre of Royal Marines (Q4, longs, steadfast, LAW)
1x Monmouthshire Territorials (Q4, support, Regular, Gun Group)
2x Monmouthshire Territorials (2x Q4, longs, Regular)
1x Monmouthshire Territorials (Q4, Headshed, Regular, Charlie G)
1x Welsh Guards Anti-tank section (Q4, support, Regular); 120mm Wombat
1x Militia 'Come on' party (Q5, longs)

The Game 

Maff began with Initiative but uncharacteristically advanced cautiously. Normally his 'inner Para' exerts itself in very aggressive tactics with the slightest whiff of a red beret. I could tell he was barely holding himself back from rushing the bridge all guns blazing. Nevertheless, the Ferret entered the table first and had an immediate success! The commander instantly spotted and killed the militia 'come on' party at the 'red' bungalow. This loss hurt as I was hoping to use them to lure the paras into my ambush.

The rest of the force came on, paras extending into the fields either side whilst one rifle group move down the road in the wake of the Ferret, which moved up to the bridge whist the Fox armed with a 30mm Rarden cannon provided overwatch.

The Government forces move forward

The Ferret came a bit too close to the bridge. I thought I had him. The bootnecks unpacked their LAW and fired straight at the Ferret. I rolled texpecting a kill. They couldn't miss.... NO! They could! The roll was low, Maff rolled high and the unscathed Ferret lashed the marines with fire from it's .5 cal MG, killing one and making another flinch.

 ex-Hotspur Bootnecks fire their LAW

I revealed a rifle group of Welsh Territorials on the other side of the road to the marines and went for two activations. Won both activations with a double 6 and turned them into 5 rounds 'rapid fire' on the exposed paras coming up behind the Ferret; killing one and flinching another.

 Welsh Territorials

The para rifle group on the left made it into the copse and laid down some ineffectual fire on the Terriers. Next turn the Terriers win this firefight killing one para and flinching another whilst only gaining a single flinch in return. In SWATTERS, flinching is basically a suppression. It's a nice little mechanic within the combat results. At this point Maff decided to bolster his base of fire and moved the Fox forward from it's overwatch position which by now had no view of the enfolding action on my left.

"Action Front!"
Platoon 20 Wombat and crew

The high profile of the Fox caused it to come into the sights of my Wombat. With  one die activation I revealed it and in the next activation sent 120mm of bad day straight into the Fox, which erupted in flames.

 The Fox is brewed.

I tried to rally my marines, but they were having none of it. I lost the activation rolls and Maff won back the initiative. Luckily his unscathed paras by the 'red' bungalow failed activation after activation and would not come into the fight till the very end. The Ferret laid down a withering fire which killed another marine and the last marine standing to flinch. Maff now de-fliched one of the paras on the road and sent them straight for the bridge.

 Marines in a sticky wicket, the paras rush the bridge

 Welsh Territorial Gun Group take them on

The Territorials gun goup could come into play now. Winning two activations, GPMG rapid fire killed two paras. But that distraction allowed a shadow accompanied by the classic whoopa, whoopa, whoopa, noise as a Wessex gunship opened up on the Wombat, and a troop carrier landed its load behind the Welsh (on the very last bit of playing surface available).

The table

 Terriers outlanked by the Eagle Flight

The Terrier gun group are forced to redeploy but luckily cause a flinch on the paras deploying from the helo. Just as things seem bad, the Headshed 'Charlie G' gunner earns his pay today and stuffs a round into the Wessex from the Post Office/shop, destroying both the helo and the rifle group inside.

The balance is back in my favour! Im thinking now that I can hold my own if not actually win the game. But the next die roll loses everything for me and seals the fate of the Welsh. Instead of using my Territorial rifles at the river bank to fire at the remaining paras on the opposite bank, which would have caused Maff to take a morale test, I instead try to unflinch my Marines again. NO! I roll low and lose initiative. So much for being 'Steadfast'!?! My Terriers at the river gain a casualty forcing a morale test which causes them to withdraw, allowing Maff's Ferret to roar over bridge in pursuit, followed by his Landie with back up rifle group.

 Resistance crumbles, Welsh withdraw in fighting order

 All the paras are now across the river. At this point whilst my gaming head told me to fight out a Rourke's Drift in the garden of the brick and pebbledashed house, Men of Harlech et al, but common sense and a glance at the clock told me the best course was to withdraw the Territorial Headshed and Gun Group at the double. Their rifle chums who had so valiantly held the riverbank are effectively surrounded and forced to give up.

What a game!

Summing Up

The game was played using our Winter of '79 house rules for SWATTERS, providing a surprisingly challenging game, yet one that was quick and fun to play. I say "quick", but tonight the game took almost an hour and a half to play through but it felt as though it was quick. I honestly thought we had only been playing for 45 minutes.

This was in part due to how the pendulum swung both ways throughout the course of the action creating a roller coaster of tension and excitement from one game turn to the next. Even within game turns. Due to the dice based 'Activations' you simply couldn't predict how things would turn out. This makes it a perfect wargame, as a bad Activation decision/die roll, stops your opponents steamroller dead, allowing you to hopefully capitalise on it.  My marine cadre simply did not perform due to a string of poor die rolls, yet the Territorials shone. Maff had a similar problem with one of his rifle groups and he couldn't budge them from the 'red' bungalow, making them effectively hors de combat for much of the game without a shot being fired.

Maff and I now both have iPads, so the game was played using Facetime which appears to be far superior to Skype in terms of connection and picture quality. The iPad is also much easier to move round the table, send instant  "recce" photos where required and can sit close enough to the action for your opponent to be able to view the table in detail.

'Man of the match' definitely goes to the Ferret. It had the luck of the devil when being fired on and consistently high combat die rolls of it's own. 

So there we have it. A surprisingly memorable game despite being thrown down as a 'quickie' for a Wednesday night after work and deploying no more than 20 figures on each side. And maybe there's a lesson in that.


Cheers
Mark

Wednesday, 19 February 2014

Mae pont yn rhybyell: 1979

Just a taster of tonight's Winter of '79 bash. This was a ding dong match between Emergency Government forces and Welsh Territorials, stiffened by a small Royal Marine cadre.

 Terriers redeploy to meet unexpected threat from rear

More Territorials hold their own
Yes, that's a Bellona Bridge

Close up of a Monmouthshire Territorial
painted for me by Jim Brent


Have to say that tonight's game was everything I wanted from Winter of '79 and I know Maff would say the same. Part-time TA soldiers take on Paras, bolstered by armoured recce elements. Despite and unashamedly 1970's Airfix feel to it all, we had great fun as the actioned see-sawed along over one and a half hours to an epic finish.

Was it a "Bridge Too Far" for Maff? More on Friday once I get a chance to write up the AAR.

Cheers
Mark

Monday, 17 February 2014

IHMN: Perry New 1860s Victorian Military Company

Our IHMN adventures are on hold whilst we look forward to Perry's forthcoming range of Mid-Victorian (1860s) British Infantry. Very 'Torchwood Institute' and perfect for In Her Majesty's Name games, but still with loads of historical potential from Canada to New Zealand at a not so 'extraordinary' price.

 Perry Miniatures


I've got a handful of Foundry's Indian Mutiny officers who may be perfect to add a touch of dash and local colour to these chaps.

Cheers
Mark