
Government Forces

Government troops
RH Models, Maff C.O.
RH Models, Maff C.O.
1x Motorised patrol from 5 Para: (3x Q4, longs, dashing)
1x Armoured Car patrol from Benson & Hedges Yeomanry (2x Q4, support, armour, dashing)
1x Eagle Flight, 5 Para (2x Q4, longs, dashing; 2 Helos, inc 1x Gunship Q4, support)
Free Wales Forces

Free Wales Territorials
Elhiem Figures, Mark C.O.
Elhiem Figures, Mark C.O.
1x Cadre of Royal Marines (Q4, longs, steadfast, LAW)
1x Monmouthshire Territorials (Q4, support, Regular, Gun Group)
2x Monmouthshire Territorials (2x Q4, longs, Regular)
1x Monmouthshire Territorials (Q4, Headshed, Regular, Charlie G)
1x Welsh Guards Anti-tank section (Q4, support, Regular); 120mm Wombat
1x Militia 'Come on' party (Q5, longs)
The Game
Maff began with Initiative but uncharacteristically advanced cautiously. Normally his 'inner Para' exerts itself in very aggressive tactics with the slightest whiff of a red beret. I could tell he was barely holding himself back from rushing the bridge all guns blazing. Nevertheless, the Ferret entered the table first and had an immediate success! The commander instantly spotted and killed the militia 'come on' party at the 'red' bungalow. This loss hurt as I was hoping to use them to lure the paras into my ambush.
The rest of the force came on, paras extending into the fields either side whilst one rifle group move down the road in the wake of the Ferret, which moved up to the bridge whist the Fox armed with a 30mm Rarden cannon provided overwatch.

The Government forces move forward
The Ferret came a bit too close to the bridge. I thought I had him. The bootnecks unpacked their LAW and fired straight at the Ferret. I rolled texpecting a kill. They couldn't miss.... NO! They could! The roll was low, Maff rolled high and the unscathed Ferret lashed the marines with fire from it's .5 cal MG, killing one and making another flinch.

ex-Hotspur Bootnecks fire their LAW
I revealed a rifle group of Welsh Territorials on the other side of the road to the marines and went for two activations. Won both activations with a double 6 and turned them into 5 rounds 'rapid fire' on the exposed paras coming up behind the Ferret; killing one and flinching another.

Welsh Territorials
The para rifle group on the left made it into the copse and laid down some ineffectual fire on the Terriers. Next turn the Terriers win this firefight killing one para and flinching another whilst only gaining a single flinch in return. In SWATTERS, flinching is basically a suppression. It's a nice little mechanic within the combat results. At this point Maff decided to bolster his base of fire and moved the Fox forward from it's overwatch position which by now had no view of the enfolding action on my left.

"Action Front!"
Platoon 20 Wombat and crew
Platoon 20 Wombat and crew
The high profile of the Fox caused it to come into the sights of my Wombat. With one die activation I revealed it and in the next activation sent 120mm of bad day straight into the Fox, which erupted in flames.

The Fox is brewed.
I tried to rally my marines, but they were having none of it. I lost the activation rolls and Maff won back the initiative. Luckily his unscathed paras by the 'red' bungalow failed activation after activation and would not come into the fight till the very end. The Ferret laid down a withering fire which killed another marine and the last marine standing to flinch. Maff now de-fliched one of the paras on the road and sent them straight for the bridge.

Marines in a sticky wicket, the paras rush the bridge

Welsh Territorial Gun Group take them on
The Territorials gun goup could come into play now. Winning two activations, GPMG rapid fire killed two paras. But that distraction allowed a shadow accompanied by the classic whoopa, whoopa, whoopa, noise as a Wessex gunship opened up on the Wombat, and a troop carrier landed its load behind the Welsh (on the very last bit of playing surface available).

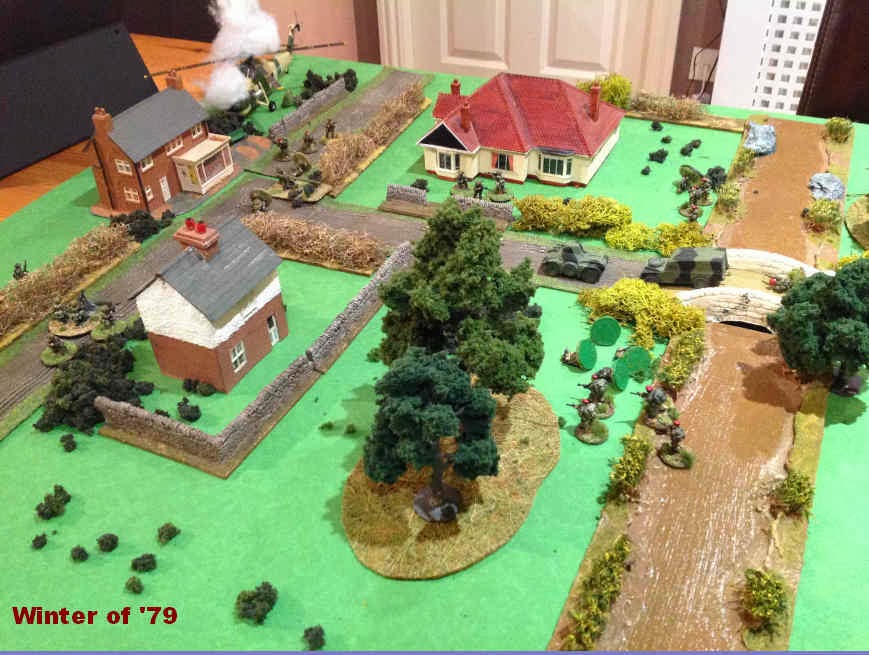
The table

Terriers outlanked by the Eagle Flight
The Terrier gun group are forced to redeploy but luckily cause a flinch on the paras deploying from the helo. Just as things seem bad, the Headshed 'Charlie G' gunner earns his pay today and stuffs a round into the Wessex from the Post Office/shop, destroying both the helo and the rifle group inside.
The balance is back in my favour! Im thinking now that I can hold my own if not actually win the game. But the next die roll loses everything for me and seals the fate of the Welsh. Instead of using my Territorial rifles at the river bank to fire at the remaining paras on the opposite bank, which would have caused Maff to take a morale test, I instead try to unflinch my Marines again. NO! I roll low and lose initiative. So much for being 'Steadfast'!?! My Terriers at the river gain a casualty forcing a morale test which causes them to withdraw, allowing Maff's Ferret to roar over bridge in pursuit, followed by his Landie with back up rifle group.
Resistance crumbles, Welsh withdraw in fighting order
All the paras are now across the river. At this point whilst my gaming head told me to fight out a Rourke's Drift in the garden of the brick and pebbledashed house, Men of Harlech et al, but common sense and a glance at the clock told me the best course was to withdraw the Territorial Headshed and Gun Group at the double. Their rifle chums who had so valiantly held the riverbank are effectively surrounded and forced to give up.
What a game!
Summing Up
The game was played using our Winter of '79 house rules for SWATTERS, providing a surprisingly challenging game, yet one that was quick and fun to play. I say "quick", but tonight the game took almost an hour and a half to play through but it felt as though it was quick. I honestly thought we had only been playing for 45 minutes.
This was in part due to how the pendulum swung both ways throughout the course of the action creating a roller coaster of tension and excitement from one game turn to the next. Even within game turns. Due to the dice based 'Activations' you simply couldn't predict how things would turn out. This makes it a perfect wargame, as a bad Activation decision/die roll, stops your opponents steamroller dead, allowing you to hopefully capitalise on it. My marine cadre simply did not perform due to a string of poor die rolls, yet the Territorials shone. Maff had a similar problem with one of his rifle groups and he couldn't budge them from the 'red' bungalow, making them effectively hors de combat for much of the game without a shot being fired.
Maff and I now both have iPads, so the game was played using Facetime which appears to be far superior to Skype in terms of connection and picture quality. The iPad is also much easier to move round the table, send instant "recce" photos where required and can sit close enough to the action for your opponent to be able to view the table in detail.
'Man of the match' definitely goes to the Ferret. It had the luck of the devil when being fired on and consistently high combat die rolls of it's own.
So there we have it. A surprisingly memorable game despite being thrown down as a 'quickie' for a Wednesday night after work and deploying no more than 20 figures on each side. And maybe there's a lesson in that.
Cheers
Mark
Great exciting batrep rep, I enjoyed it greatly. Thanks.
ReplyDeleteCracking stuff - well done.
ReplyDeleteGreat AAR and a good heads up on Swatters, might have to give these a try as I am looking for a more modern rules set for my latest chechnya outing.
ReplyDeleteCheers
Stu